
As an introduction to eCognition image analysis, we’ll analyze a very simple image. The example is very rudimentary, but will give you an overview of the working environment. The key concepts are the segmentation and classification of image objects; in addition, it will familiarize you with the mechanics of putting together a rule set.
Download the image shapes.tif from our website http://community.ecognition.com/home/copy_of_an-introductory-tutorial and open it by going to File>New Project. When you press Save or Save As, eCognition Developer uses this image to create a project (an additional file will be created with the extension .dpr) and the Create Project dialog will appear. Name the new project ‘Shape Recognition’, keep the default settings and press OK.
Of course, shapes.tif is a raster image and to start any meaningful analysis, we have to instruct the software to recognize the elements as objects; after we’ve done this, we can then add further levels of classification. In eCognition software, these instructions are called rule sets and they are written and displayed in the Process Tree window.
The first step in any analysis is for the software to divide up the image into defined areas – this is called segmentation and creates undefined objects. By definition, these objects will be relatively crude, but we can refine them later on with further rule sets. It is preferable to create fairly large objects, as smaller numbers are easier to work with.
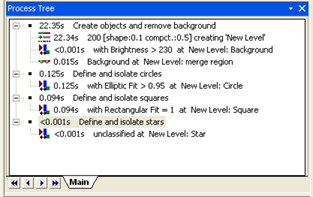
Right-click in the Process Tree window and select Append New from the right-click menu. The Edit Process dialog appears. In the Name field, enter ‘Create objects and remove background’. Press OK.
TIP: In the Edit Process box, you have the choice to run a process immediately (by pressing Execute) or to save it to the Process Tree window for later execution (by pressing OK).
In the Process Tree window, right-click on this new rule and select Insert Child. In the Algorithm drop-down box, select Multiresolution Segmentation. In the Segmentation Settings, which now appear in the right-hand side of the dialog box, change Scale Parameter to 50. Press Execute.
The image now breaks up into large regions. When you now click on parts of the image, you’ll see that – because our initial images are very distinct – the software has isolated the shapes fairly accurately. It has also created several large objects out of the white background.
This action illustrates the parent-child concept in eCognition Developer. It’s possible to keep using Append New to add more and more rules, but it’s best to group related rules in a container (a parent process), when you want a series of processes to create a particular outcome. You can achieve this by adding sibling processes to the parent process, using the Insert Child command.
For more information on segmentation, see Multiresolution Segmentation; for more detailed information, consult the Reference Book.
The obvious attribute of the background is that it is very homogeneous and, in terms of color, distinct from the shapes within it.
In eCognition Developer you can choose from a huge number of shape, texture and color variables in order to classify a particular object, or group of objects. In this case, we’re going to use the Brightness feature, as the background is much brighter then the shapes.
You can take measurements of these attributes by using the Feature View window. The Feature View window essentially allows you test algorithms and change their parameters; double-click on a feature of interest, then point your mouse at an object to see what numerical value it gives you. This value is displayed in the Image Object Information window. You can then use this information to create a rule.
TIP: Running algorithms and changing values from the Feature View tree does not affect any image settings in the project file or any of the rule sets. It is safe to experiment with different settings and algorithms.
From the Feature View tree, select Object Features > Layer Values > Mean, then double-click on the Brightness tag. A Brightness value now appears in the Image Object Information window. Clicking on our new object primitives now gives a value for brightness and the values are all in the region of 254. Conversely, the shapes have much lower brightness values (between 80 and 100). So, for example, what we can now do is define anything with a brightness value of more than 250 as background.
Right-click on the sibling you just created (the ‘200 [shape: 0.1 …’ process) and select Append New – this will create a new rule at the same level. (Once we’ve isolated the background we’re going to stick the pieces together and give it the value ‘Background’.)
In the Algorithm drop-down box, select Assign Class. We need to enter the brightness attributes we’ve just identified by pressing the ellipsis (…) in the value column next to Condition, which launches the Edit Condition window. Go to the Value 1 field, select From Feature ... and then select Object Features > Layer Values > Mean and double-click on Brightness. We can define the background as anything with a brightness over 230, so select the ‘greater than’ button (>) and enter 230 in the Value 2 field. Press OK.
The final thing to do is to classify our new criteria. In the Use Class parameter of Algorithm Parameters on the right of the Edit Process window, overwrite ‘unclassified’, enter ‘Background’ and press Enter. The Class Description box will appear, where you can change the color to white. Press OK to close the box, then press Execute in the Edit Process dialog.
TIP: It’s very easy at this stage to miss out a function when writing rule sets. Check the structure and the content of your rules against the screen capture of the Process Tree window at the end of this section.
As a result, when you point your mouse at a white region, the Background classification we have just created appears under the cursor. In addition, ‘Background’ now appears in the Class Hierarchy window at the top right of the screen. Non-background objects (all the shapes) have the classification ‘Unclassified’.
As we’ve now got several pieces of background with a ‘Background’ classification, we can merge all the pieces together as a single object.
Again, right-click on the last rule set in the Process Tree and select Append New, to create the third rule in the ‘Create objects and remove background’ parent process.
In the Algorithm drop-down box, select Merge Region. In the Class Filter parameter, which launches the Edit Classification Filter box, select ‘Background’ – we want to merge the background objects so we can later sub-divide the remaining objects (the shapes). Press OK to close the box, then press Execute. The background is now a single object.
TIP: To view the classification of an image object within an image, you must have the View Classification button selected on the horizontal toolbar. The classification is displayed when you hover over the object with the cursor.
Some properties of circles:
Some properties of squares:
Some properties of stars:
eCognition Developer has a built-in algorithm called Elliptic Fit; it basically measures how closely an object fits into an ellipse of a similar area. Elliptic Fit can also be found in Feature View and can be found by selecting Object Features > Geometry > Shape, then double-clicking on Elliptic Fit. Of course a perfect circle has an elliptic fit of 1 (the maximum value), so – at least in this example – we don’t really need to check this. But you might want to practice using Feature View anyway.
To isolate the circles, we need to set up a new rule. We want this rule to be in the same hierarchical level as our first ‘Create objects …’ rule set and the easiest way to do this is to right-click on the ‘Create objects’ rule set and select Append New, which will create a process at the same level. Call this process ‘Define and isolate circles’.
To add the rule, right-click the new process and select Insert Child. In the Algorithm drop-down box, select Assign Class. Click on Condition and go to the Value 1 field. select From Feature and navigate towards the Elliptic Fit feature, using the path describe earlier. To allow for a bit of image degradation, we’re going to define a circle as anything with a value of over 0.95, thus you should use the ‘greater than’ symbol as operator and enter the value 0.95 in the Value 2 field. Press OK.
Back in the Edit Process window, we will give our classification a name. Replace the ‘unclassified’ value in Use Class with ‘Circle’, press enter and assign it a color of your choosing. Press OK. Finally, in the Edit Process window, press Execute to run the process. There is now a ‘Circle’ classification in the class hierarchy and placing your cursor over the circle shape will display the new classification.
There is also a convenient algorithm we can use to identify squares; the Rectangular Fit value (which for a square is, of course, one).
The method is the same as the one for the circle – create a new parent class and call it ‘Define and isolate squares’ When you create the child, you will be able to find the algorithm by going to Object Features > Geometry > Shape > Rectangular. Set the range to ‘=1’ and assign it to a new class (‘Square’).
There are criteria you could use to identify the star but as we’re using the software to separate and classify squares, circles and stars, we can be pragmatic – after defining background, circles and squares, the star is the only objects remaining. So the only thing left to do is to classify anything ‘unclassified’ as a star.
Simply set up a parent called ‘Define and isolate stars’, select Assign Class, select ‘unclassified’ in the Class Filter and give it the value ‘Star’ in Use Class.
Learn more about eCognition based on
... case studies and demos based on videos http://www.ecognition.com/support/media-library/videos
... user community guided tours and tutorials http://www.ecognition.com/community
© 2019, Trimble Inc. All rights reserved. 